HP LaserJet Pro M304-M305, M404-M405 - Setting up the printer (hardware)
HP LaserJet Pro M304-M305, M404-M405 - Setting up the printer (hardware)
This document explains how to set up the physical parts of the printer. Complete these steps before installing the printer software on the computer.
If the printer hardware is already set up, see Step eight: Install the software at the end of this document for help with software installation.
In addition to the instructions provided in this document, you can view the following video of how to unpack and set up the printer:
NOTE:Your printer model might be different than the one shown in the video, but the steps are the same.
This document includes the following steps to set up the printer:
Step one: Unpack the printer
-
Select a site to place the printer that meets the following specifications:
-
A sturdy, well-ventilated, dust-free area, away from direct sunlight
-
Temperature range: 17.5° - 25°C (63.5° - 77°F)
-
Humidity range: 30% - 70%
-
Sufficient space around the printer to open alldoors and trays.
Figure : Printer dimensions when fully opened
-
-
Take the HP printer out of the box, and then remove the packaging material. Verify that the contents match this illustration:
NOTE:
HP recommends recycling packing materials whenever possible.Figure : Contents of the box
Step two: Load Tray 2
-
Pull the tray out and lift up slightly to remove it completely from the printer.Figure : Open the tray

-
Adjust the paper-width guides by squeezing the adjustment latch on the left guide and sliding the guide to the size of the paper being used.Figure : Adjust the guides
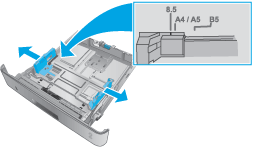
-
Adjust the paper-length guide by squeezing the adjustment latch and sliding the guides to the size of the paper being used.Figure : Adjust the guides

-
Load paper into the tray.
NOTE:
Do not adjust the paper guides tightly against the paper stack. Adjust them to the indentations or markings in the tray.NOTE:
To prevent jams, adjust the paper guides to the correct size and do not overfill the tray. Be sure that the top of the stack is below the tray full indicators, as shown in the enlargement in the illustration.NOTE:
If the tray is not adjusted correctly, an error message might display during printing or the paper might jam.Figure : Load paper
-
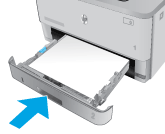
Slide the tray completely into the printer.Figure : Close the tray
Stepthree: Connect the network cable (optional)
If your printer is a network model and you want to connect the printer to a network, connect the network (Ethernet) cable now.
NOTE:A network cable is not included with the printer.
CAUTION:Do not connect a USB cablenow. To use a USB cable to connect the printer to the computer, connectit when prompted during software installation.
Step four: Connect the power cable and turn on the printer
-
Connect the power cable between the printer and a grounded AC outlet. To prevent damage to the printer, use only the power cable that is provided with the printer.
CAUTION:
Make sure the power source is adequate for the printer voltage rating. The voltage rating is on the printer label. The printer uses either 110-127V AC or 220-240V AC and 50/60 Hz.Figure : Connect the power cable
-
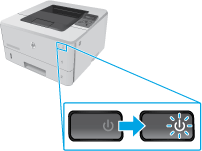
Press the Power button to turn on the printer.Figure : Turn on the printer
-
Wait for 60 seconds before continuing. During this time, if the printer is connected to a network, the network recognizes the printer and assigns an IP address or host name for the printer.
Step five: Set up the control panel
-
On the control panel, use the arrow buttons and the OK button to set up the Language, Location, and Printer Setup Environment. Select one of these options:
-
Self-managed: Optimized default settings for most users that include guided setup and configuration steps andautomatic updates
-
IT-managed: Optimized default settings for fleet manageability
-
-
Follow any additional prompts to complete the control panel setup.
NOTE:
Settings are fully customizable after this initial setup.
For advanced setup of network-connectedprinters, enter the printer IP address in the address bar of a Webbrowser after software installation is complete.
Step six: Verify the printer functions
To verify that the printer prints, complete the following steps to print a configuration page:
-
On the printer control panel, press the OK button to display the Home screen. Use the arrow buttons to navigate to Setup, and then press the OK button again.
-
Use the arrow buttons and the OK button to navigate to and open the Reports menu, and then select the Printer configuration Report.
-
If the printer is connected to a network, find the IP address on the Jetdirect page.
-
IPv4: If the IP address is 0.0.0.0, or 192.0.0.192, or 169.254.x.x, manually configure the IP address. Otherwise, the network configuration was successful.
-
IPv6: If the IP address begins with "fe80:", the printer should be able to print. If not, manually configure the IP address.
Figure : Jetdirect page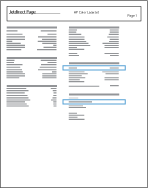
-
NOTE:The Configuration Page includes firmware version information that you can refer to when updating the firmware.
Stepseven: Update the firmware (optional but recommended)
HP regularly updates features that are availablein the printer firmware. Update the printer firmware to take advantageof the most current features.
NOTE:Check with the networkadministrator before updating the printer firmware.
For information on updating the printerfirmware, see Update the firmware.
Step eight: Install the software
After completing the previous setup steps, installthe printer software. For software installation instructions, click thelink for the computer operating system and type of connection.
Windows
-
Installing a Printer Driver with a USB cable (Windows)
-
Installinga printer driver with an Ethernet Cable (Windows)
-
Installingthe printer software in Windows on a Wireless Network
macOS
-
Installing a Printer Driver with a USB cable (macOS)
-
Installingthe printer software in macOS on a Wired (Ethernet) Network
-
Installingthe printer software in macOS on a Wireless Network
Setup is complete. If you did not register your printerduring software installation, go to www.register.hp.com toregister now.
Find more information
For more information, visit the support website for this printer.
https://support.hp.com/


Comments
Post a Comment