HP LaserJet Pro M404dn - Printer status is "Offline" and the printer does not print (Windows)
HP LaserJet Pro M404dn - Printer status is "Offline" and the printer does not print (Windows)
Issue
A printer status of "Offline" displays on the computer and the printer does not print.
Figure : Printer status "Offline" in Devices and Printers
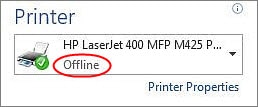
When the printer status is "Offline," it indicates that the computer cannot communicate with the printer. This issue can occur for various reasons, such as the following:
-
The printer is turned off
-
The network cable or USB cable is disconnected
-
The printer is set to "Use printer offline"
The following symptoms might also be present:
-
Printer does not respond
-
Printer icon(s) status is offline or greyed out
-
The default printer driver has been changed
-
Unable to find printers or other devices on the network
-
File and printer sharing is disabled
-
Network port IP address changed or is reset
-
Network loses connection with the printer after it enters sleep mode
Applicable printers
This document applies to HP LaserJet Pro printers.
Solution
Try the following steps in the order presented to resolve the issue.
NOTE:Some of the steps below apply only to network-connected printers.If your printer is connected via a USB cable, skip any steps that are intended only for network-connected printers.
If one of the steps resolves the issue, there is no need to continue troubleshooting.
Step one: Turn off Smart Install
-
From the Home screen on the printer control panel, select the Service menu.
-
Navigate to the Smart Install option and select Off.
-
Restart the computer.
-
Try to print.If the issue persists, continue to the next step.
Step two: Perform a power reset and check connections
Resetting the power to the printer is a quick way to reset the printing system and prepare for further troubleshooting, if necessary.
Follow these steps to perform a power reset and check connections:
-
If the printer is off, turn on the printer, and then check the printer status:
-
If the printer starts printing jobs from the print queue, then the printer is back online and you do not need to continue troubleshooting.
-
If the computer still shows the printer status as "Offline," continue to the next step.
-
-
With the printer turned on, disconnect the power cord from the rear of the printer and from the wall outlet, and then wait at least 60 seconds.
-
Make sure the USB or network cable is securely connected and not damaged.
-
Make sure the router or switch cables are securely connected.
-
Restart your computer and wait for it to reboot.
-
Reconnect the power cable to the rear of the printer and into the wall outlet.
-
If the printer does not turn on by itself, press the Power button to turn it on.
-
Try to print.
-
If you are able to print, the printer is online again. If the printer goes offline again when trying to print another job, continue with the next steps in this document.
-
If the printer remains offline and you are unable to print, continue to the next step.
-
Step three: Use HP Print and Scan Doctor
HP provides a free tool called "HP Print and Scan Doctor" that can be used to diagnose and resolve a "Printer offline" error message.
Follow these steps to download and run HP Print and Scan Doctor:
-
Go to HP Print and Scan Doctor.
-
Click Download Now, and then follow the on-screen prompts to download and run the software.
-
If this resolves the issue, you do not need to continue troubleshooting.
-
If the issue persists, continue to the next step.
-
Step four: Manually set the default print driver
Make sure the default printer driver matches the printer that you are trying to print to.
Click your operating system in the options below, and then follow the steps provided.
Windows 10
-
On your computer, right-click the Windows icon in the bottom-left corner of the screen, and then click Search.
-
In the Search text-field, type "Printers," and then click Printers & scanners in the list of results.Figure : "Printers & scanners" in the list of results

-
In the Printers & scanners window, click the name of the printer you are trying to print to, and then click Manage.
-
In the Manage your device window, look for Printer status.If the printer is already set as the default printer, the Printer status will be set to Default.Figure : Printer status set to Default

-
If the Printer status is already set to Default, skip to Step five: Make sure the printer is connected to the network (Network-connected printers only).
-
If the Printer status is not set to Default, continue to the next step.
-
-
Click Set as default to set the printer as the default printer.Figure : Click "Set as default" to set the printer as the default printer

-
Close the Manage your device window, and then try printing again.
-
If this resolves the issue, you do not need to continue troubleshooting.
-
If the issue persists, continue to the next step.
-
Windows 8 or 7
-
On your computer, open the Control Panel, and then click View devices and printers to open the Devices and Printers window.
-
In the list of devices and printers, find the printer that you are trying to print to and check to see if it is set as the default printer (indicated by a green check mark).Figure : Default printer (as indicated by the green check mark) in Devices and Printers

-
If the printer that you are trying to print to is already set as the default printer, skip to Step five: Make sure the printer is connected to the network (Network-connected printers only).
-
If the printer that you are trying to print to is not set as the default printer, continue to the next step.
-
-
Right-click the printer that you want to set as the default, and click Set as Default Printer.
-
Try to print.
-
If this resolves the issue, you do not need to continue troubleshooting.
-
If the issue persists, continue to the next step.
-
Step five: Make sure the printer is connected to the network (Network-connected printers only)
Follow these steps to make sure the printer is connected to the network:
NOTE:The following steps apply only to network-connected printers.If your printer is connected via USB cable, skip to Step six: Check the "Use printer offline" setting.
-
For wireless connections, make sure Wi-Fi is turned on the computer or tablet, and make sure you are connected to the correct wireless network (SSID).
-
Print a Configuration Page or Network Summary Page from the printer control panel and make sure the printer has a valid IP address.
-
If an IP address is not assigned, or if the IP address is "156.254.xxx.xxx" or "169.xxx.xxx" (and indicates auto-IP), then the network is not configured properly.For steps on how to resolve network configuration issues, refer to one of the following documents:
-
HP LaserJet, HP OfficeJet, HP PageWide - Solve network problems
-
HP LaserJet, HP PageWide Enterprise - Solve wireless network problems
-
-
If the IP address is assigned and valid, then continue to the next step.
-
-
Open the Embedded Web Server (EWS) for your printer using the IP address that you obtained in the previous step:
-
On your computer, open a Web browser and in the address field, type the printer IP address exactly as it appears on the Configuration Page, press Enter on the keyboard, and then select Continue to this website….Figure : Example of an IP address in a browser address line
 The EWS Home page will display.
-
If the EWS Home page displays, it indicates that the printer is connected to the network. Skip to Step six: Check the "Use printer offline" setting to continue troubleshooting.
-
If the EWS Home page does not display, continue to the next step.
-
-
-
Test network communication by pinging the network using a command prompt:
-
On your computer, click the Windows icon in the bottom-left corner of the screen, click Run, type "cmd" in the text-field, and the click OK.The command-line prompt will open and display on the screen.
-
In the command-line, type "ping" and then type the IP address for the printer.
-
If the printer returns a response time, the network is working. Skip to Step six: Check the "Use printer offline" setting to continue troubleshooting.
-
If the ping command failed or returns "Request timed out," the printer is not connected to the network.Refer to one of the following documents for information on troubleshooting network problems:
-
HP LaserJet, HP OfficeJet, HP PageWide - Solve network problems
-
HP LaserJet, HP PageWide Enterprise - Solve wireless network problems
-
-
-
NOTE:If you have been experiencing intermittent loss of network connectivity, update the firmware on your printer.For instructions on how to update the firmware, click the following link:HP LaserJet Pro - Update the printer firmware
Step six: Check the "Use printer offline" setting
Follow these steps to make sure that the printer is not set to "Use printer offline":
-
On your computer, open the Control Panel, and then click View devices and printers to open the Devices and Printers window.
-
Right-click the printer and then click See what's printing.
-
Select Printer, and then select to clear any selections (indicated by a check mark) next to Pause Printing or Use Printer Offline, if selected.Figure : The "Use Printer Offline" setting enabled

-
If you removed a selection, try to print.
-
If you are able to print, the printer is online again. If the printer goes offline again when trying to print another job, continue with the next steps in this document.
-
If the printer remains offline and you are unable to print, continue to the next step.
-
Step seven: Make sure the network connection settings were not recently changed (Network-connected printers only)
NOTE:The following steps apply only to network-connected printers.If your printer is connected via USB cable, skip to Step eight: Make sure the correct port is selected.
If the computer or tablet is running Windows 8 (or Windows 8.1) and the connection was recently changed from a Private to a Public network, and then reverted back to a Private network, refer to the following document to troubleshoot the issue:
HP LaserJet, HP PageWide, HP OfficeJet - Unable to find network printer in Windows 8 after changing the network from Private to Public
-
If this resolves the issue, you do not need to continue troubleshooting.
-
If the issue persists, continue to the next step.
Step eight: Make sure the correct port is selected
If the driver is using the wrong communication port, then the connection cannot be made and the printer will remain offline.
In addition to the steps provided below, you can view the following videos of how to select the correct port for your HP printer in Windows.
Follow these steps to make sure the correct port is selected:
-
On your computer, open the Control Panel, and then click View devices and printers to open the Devices and Printers window.
-
Right-click the printer, and then click Printer Properties.
-
In the Properties window, click the Ports tab.A list of ports will display.
-
Make sure that the selected Port(s) and Description match the connection-type being used with the printer.
-
Make sure the port-type has "network" or "IP" in the description.
-
If you see multiple listings for the same port-type, change the Port selection to a different port.
Figure : Port selection for a network connection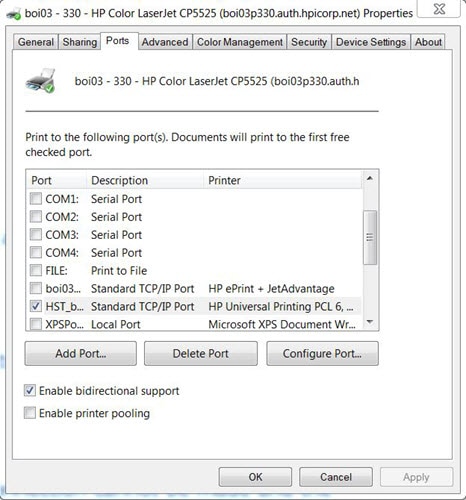
-
-
Click Configure Port, and make sure the printer IP address matches the Port IP address.
-
If the port selected is "WSD," skip to Step nine: Uninstall the printer software.
-
If the port selected is a network port (the printer name or IP address), skip to Step nine: Uninstall the printer software.
-
If the port selected is "IP," make sure the IP address matches the printer's IP address. If it doesn’t match, type the printer's IP address in the Printer Name or IP Address field, and then click OK.
NOTE:
If you do not know the printer's IP address, print a Configuration Page from the printer control panel. The printer's IP address is listed on the Configuration Page.
-
-
Click Apply and then click OK to save the settings.
-
Try to print.
-
If this resolves the issue, you do not need to continue troubleshooting.
-
If the issue persists, continue to the next step.
-
Step nine: Uninstall the printer software
Use one of the methods below to uninstall the printer software.
Method one: Uninstall from Windows 10
Use this method if you have Windows 10 installed on your computer.
-
In Windows, search for and open Apps & features.
-
Scroll through the list until you find your printer model.
-
Click your printer model, and then click Uninstall.
-
Follow the on-screen prompts to uninstall the printer software.
-
After uninstalling the software, restart your computer and then return to this document and proceed to Step ten: Install the most current printer software.
Method two: Uninstall from the HP printer folder
Use this method if you have an HP printer folder available from the Start menu. If not, skip to Method three: Uninstall from the Devices and Printers window.
-
From the Start menu, open All programs > HP > HP printer, and then select Uninstall Product Software.
-
Restart the computer, return to this document, and then proceed to Step ten: Install the most current printer software.
Method three: Uninstall from the Devices and Printers window
Use this method if you do not have an HP printer folder or if you used the Add a printer wizard to install the printer originally.
-
From the Start menu, open Devices and Printers, right-click the printer icon, and then select Remove device.
-
Restart the computer, return to this document, and then proceed to Step ten: Install the most current printer software.
Step ten: Install the most current printer software
Follow these steps to install the most current printer software:
-
Go to www.support.hp.com/drivers.
-
On the Let’s identify your product to get started screen, select the Printer icon.Figure : Printer icon

-
In the Enter your product name text-field, type your printer model (e.g. LaserJet M528), and click Submit.The Software and drivers page for your printer will display.The website will automatically detect your computer operating system and queue up a list files (specific to your printer model) that are available for download.
-
Scroll down and review the available software and driver options. The options available vary depending on the printer.
NOTE:
HP recommends the Full Solution or Full Feature Software and Driver option to optimize printer performance and features. -
Click the file name in the list to review the details, and then click Download next to the file name.
-
When the download file prompt displays in the browser, click Run to start the download, or click Save As to save the .exe file to a location on your computer.
NOTE:
If you save the file on your computer, make note of the file location. When you are ready to install, navigate to the .exe file and double-click the file to start the installation process. -
Follow the on-screen instructions to install the printer software.
NOTE:If the issue persists, and you are using HP Full Feature Software, a compatibility problem might exist. Uninstall the HP Full Feature Software and try installing the Basic or PCL6 driver from www.support.hp.com/drivers.
Step eleven: Try connecting the printer to another computer
If you have access to another computer, install the basic driver from www.support.hp.com/drivers, connect the printer using the same type of connection, and try to print.
-
If the new connection does not work, then the printer might need to be serviced, or the printer might need to be connected with a USB cable, depending on the supported connection type.To check the supported connection-type, click the link below that is applicable to your Windows operating system and then use the information in that document to determine which connection types are available for your specific printer model.
-
HP Printers - Driver and software support for Windows 7
-
HP Printers - Driver and software support for Windows 8 and Windows 8.1
-
HP Printers - Printers compatible with Windows 10
-
https://support.hp.com/


Comments
Post a Comment